HOW TO BUILD PVC RABBITS HUTCH
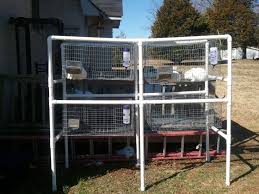
Building rabbit cages, chicken coops, or any sort of PVC frame is simple, fast, and will last a long time. This rabbit hutch uses 1 1/2 SCH 40 pipe and is about 8′ x 6′ x 3′ deep. It can hold up to six rabbit cages. Why six and not four like most? If you get a sick rabbit or two or ever plan to breed your rabbits you’ll appreciate the extra cages.
Materials Needed (all is 1 1/2″ PVC):Tools Required:
PVC Saw (or hacksaw)
PVC Cleaner And Cement
Sandpaper or debur tool
Tape Measure
There are several PVC rabbit hutch plans online, but really, just go to your local hardware store and stare at the PVC connectors for a while. These rabbit hutches are so easy to build that you can very easily come up with a plan, especially if you’ve ever worked with PVC or are the DIY creative type. You’ll be inspired in no time.
But, if you like instructions and planning before you start then here’s a cool design for you. This design is modular unlike most other PVC frame designs on the web, meaning you can continue building length·wise however long you want. Need 8 cages instead of 6? no problem! How about 12? Easy as pi(p)e.
But, if you like instructions and planning before you start then here’s a cool design for you. This design is modular unlike most other PVC frame designs on the web, meaning you can continue building length·wise however long you want. Need 8 cages instead of 6? no problem! How about 12? Easy as pi(p)e.
This is a two tiers design because it’s a very efficient way to stack rabbits. Each cage will need a slanted roof made out of corrugated plastic or other material (not shown). Corrugated plastic is easy to clean, but wood works too. I would avoid metal as it could get pretty hot.
This slanted roof is important. will help protect the rabbits from the elements as well as direct the rabbit droppings from the top tiers. You can add an optional worm bed under the cages by using 2×6 lumber to build a rectangular box underneath the PVC frame.
Here’s what you’ll need

Materials Needed (all is 1 1/2″ PVC):Tools Required:
PVC Saw (or hacksaw)
PVC Cleaner And Cement
Sandpaper or debur tool
Tape Measure
80 feet – 1 1/2 in. PVC Sch 40. Sch 20 will be too thin.
6 – Caps
2 – Couplers
4 – Elbows
14 – Tees
2 – X’s (4-way couplers)
6 – Caps
2 – Couplers
4 – Elbows
14 – Tees
2 – X’s (4-way couplers)
PVC Cut List:
4 – 17 1/2 inch
4 – 18 inch
4 – 13 1/2 inch
6 – 19 1/4 inch
2 – 37 3/4 inch
2 – 14 3/4 inch
4 – 36 inch
8 – 48 inch
4 – 17 1/2 inch
4 – 18 inch
4 – 13 1/2 inch
6 – 19 1/4 inch
2 – 37 3/4 inch
2 – 14 3/4 inch
4 – 36 inch
8 – 48 inch
Directions
1. Cut your PVC pipe to correct lengths as per the cut list, and debur all the ends with sandpaper or a debur tool. A debur tool works better.
2. Assemble the middle legs, 2 total:
- Start with a cap, then add a 37 3/4″ PVC. Then add a 4-way connector.
- Stick a 8 3/4″ PVC into the connector and put a Coupler on and add a 19 1/4″ PVC.
- Finally add a Tee, oriented the same way as the 4-way connector. You’re done.
3. Assemble the Style 1 end legs, 2 total:
- Start with a elbow, then insert a 19 1/4″ PVC, put a Tee lengthwise on the other end of the pipe 90 degrees from the elbow TO THE LEFT.
- Next insert a 13 1/2″ PVC into the Tee and add a second Tee that is 90 degrees from the first T.
- Now insert a 18″ PVC into your second Tee and add one more Tee aligned with the first Tee.
- Stick a 17 1/2″ PVC into the Tee and add a end cap. You’re done.
4. Assemble the Style 2 end legs, 2 total:
- Start with a elbow, then insert a 19 1/4″ PVC, put a Tee lengthwise on the other end of the pipe 90 degrees from the elbow TO THE RIGHT.
- Next insert a 13 1/2″ PVC into the Tee and add a second Tee that is 90 degrees from the first T.
- Now insert a 18″ PVC into your second Tee and add one more Tee aligned with the first Tee.
- Stick a 17 1/2″ PVC into the Tee and add a end cap. You’re done.
5. Glue two 36″ PVC piece to a Style 1 end leg and a Style 2 end leg. Repeat on the other set of end legs. This will make two “Double-H” shaped ends (see picture above).
6. Insert and glue two 48″ PVC arms into the top and middle section of an end leg “Double-H” section. Repeat on all four end legs.
7. Insert and glue the middle legs to one set of the 48″ PVC now connected to the “Double-H” sides.
8. Glue the remaining 48″ PVC pieces into the middle legs. Don’t try to get ahead of yourself here, once you get one piece in you have to go for it or the glue will harden before it’s in all the way.
9. (optional) To Make It Modular – If you would like to make a modular design, make two more middle legs and cut four more pieces of 48″ PVC. Add them between the first set of middle legs and one set of the end legs. Do this as many times as you need.
Optionally you can also replace the elbows and middle couplings on the end legs and continue adding 48″ PVC pipes and another set of end legs to build as many as you want. This way you can try not gluing these together so you could add or remove them as your rabbit herd size changes.
Now that your modular frame is finished it’s ready to hold up to six rabbit cages, four if you didn’t go modular.


